One Girl and her Thermie

Enter your email address to receive latest offers and recipes:*
How to purchase a Thermomix®?

how to save money with a Thermomix

10 ways to save money with a Thermomix this Spring

As April is the month of spring, it’s the perfect time to start afresh and make some changes to your finances. If you’re looking for ways to save money this month, you might not have thought about using your Thermomix. However, this versatile kitchen gadget can be used for much more than just cooking up delicious meals.

Here are 10 ways you can save money this April using your Thermomix:


  1. Meal planning: One of the most effective ways to save money is by planning your meals in advance. With your Thermomix, you can easily create a weekly meal plan and then use the guided cooking feature to ensure that you’re making the most of your ingredients.s-well-CJdZ800-Fbs-unsplash
  2. Batch cooking: If you’re cooking for one or two people, it’s often more economical to batch cook and freeze your meals. Your Thermomix can help you to make large batches of soups, stews, and curries that you can then portion out and freeze for later.
  3. DIY staples: With a Thermomix, you can make a range of kitchen staples at home, such as bread, pasta, and nut butter. This can save you money in the long run, as you won’t need to buy these items from the store.
  4. Cooking from scratch: Another way to save money is by cooking from scratch, rather than buying pre-made meals or processed foods. Your Thermomix can help you to create homemade sauces, marinades, and condiments that are healthier and more cost-effective than store-bought alternatives. tetiana-bykovets-Ht7ZhGt2UXg-unsplash

  5. Preserving: If you have a surplus of fresh produce, your Thermomix can help you to preserve it for later. You can use it to make jams, pickles, and chutneys, which will keep for months in the pantry. brooke-lark-kwaP8ybRPWk-unsplash
  6. Homemade cleaning products: Your Thermomix can also be used to make homemade cleaning products, such as all-purpose cleaners and laundry detergent. This can save you money on expensive cleaning products, while also being better for the environment.jeshoots-com-__ZMnefoI3k-unsplash
  7. Grinding coffee beans: If you’re a coffee lover, you can save money by grinding your own coffee beans at home. Your Thermomix can grind coffee beans to the perfect consistency, ensuring a delicious cup of coffee every time.
  8. Making your own baby food: If you have a baby, your Thermomix can be a great tool for making your own baby food. This is often much cheaper than buying pre-made baby food, and it also allows you to control the ingredients.
  9. Making your own skincare products: Your Thermomix can also be used to make your own skincare products, such as face masks and body scrubs. This can save you money on expensive skincare products, while also being better for your skin. diana-light-pBBxMUCgwuU-unsplash
  10. DIY gifts: Finally, your Thermomix can be used to make homemade gifts for your loved ones. You can create delicious treats, such as homemade chocolates or cookies, or create a personalized gift, such as a homemade candle.

In conclusion, your Thermomix can be a valuable tool for saving money this April. From meal planning and batch cooking to making your own cleaning products and skincare, there are many ways that you can use your Thermomix to save money and live a more sustainable lifestyle. So, dust off your Thermomix and start exploring all the ways you can use it to save money this month.

Disclaimer – Thermomix® is a cooking appliance intended to be only used for food preparation.

However, the recipes here are things I do with my own Thermomix.  I also have multiple Thermomixes and TM bowls, so I can safely use separate bowls for making these without any cross-contamination. I also clean the bowls thoroughly with soap, then vinegar, and finally run them through the dishwasher to ensure that it is thoroughly clean before making a food recipe in my bowl. If in any doubt, don’t make them.

Save money with Thermomix: Butter

Save money with Thermomix. It’s what we as owners and users say all the time. But finally, I’m able to share some of the cost savings with specific recipes like this butter recipe which is one of our household staples but also one that is a wow, demonstration recipe.

Why is it a wow recipe? Well, this recipe is so easy to make but showcases some of the greatest Thermomix functions – the whipping function. Home-made butter is incredibly easy to make but sounds rather impressive. Butter begins by over-whipping cream which can be done with a Thermomix.

But we’re here to talk about cost savings, so I’ve done a quick search for some tomato soups in an online supermarket. I’ve chosen Sainsbury’s today, but I will be comparing all of them in this series of articles to be fair.

Butter prices:

Compared to double cream:

In fairness, the £0.50 as of today’s date (December 28th 2022) doesn’t seem that much producing 250g butter from 600ml of double cream, but the trick is when do you buy your double cream >> read buy it at a discount and what do you do with your butter > read, turn it into flavoured butters.

The addition of 5-10% of flavouring elevates the falvour of basic butter but when buying store bought, increased the prices by 60-100% too.

Who doesn’t like a flavoured butter?

Ingredients

  • 600 g pure cream
  • 500 g chilled water

Preparation

  1. Insert butterfly whisk. Place cream into mixing bowl and beat 1-3 min/speed 4, or until solids and liquids have separated. Remove butterfly whisk.
  2. Using the simmering basket, strain liquids from solids, reserving buttermilk for later use, if desired.
  3. Place water and butter solids into a mixing bowl and mix 5-10 sec/speed 4. Liquids and solids should separate again (see Tips).
  4. Using the simmering basket strain liquids from solids a second time, so that only butter remains. Roll the butter into a sausage shape to make butter rounds, form into a rectangular shape or spoon into an airtight container (see Tips). Use as needed.

Hints & Tips

  • Cream closer to its expiry date will separate faster.
  • For butter that stays fresher for longer, wash a second time using 500 g chilled water in step 3 to ensure butter is completely clean.
  • This recipe will produce approx. 250 g buttermilk. Reserve the buttermilk (liquid portion) after draining in step 2 to use in scones, breads, pancakes, soups or hot drinks. See Cookidoo® for recipes. Buttermilk can also be frozen for later use.
  • Butter will keep sealed in the freezer for up to 3 months.
  • Butter will keep sealed in the fridge for up to 2 weeks.
  • Herb butter: place 1 garlic clove; 5 sprigs fresh dill, leaves only; 5 sprigs fresh flat-leaf parsley, leaves only; and 6 fresh basil leaves into mixing bowl and chop 3 sec/speed 7. Scrape down sides of mixing bowl with spatula then proceed as per recipe.
  • Salted butter: add ½ tsp sea salt after washing in step 3 and mix for a few seconds to incorporate. Salt assists in giving the butter a longer shelf life.
  • Spreadable butter: add 50 g oil, adjusted to taste and whip 15 sec/speed 4 through finished butter before storing in the fridge.
  • Lighter butter: add 50 g reserved buttermilk and whip 15 sec/speed 4 back into the finished butter before storing in the fridge.
  • Flavoured butter: add other flavours (e.g. oils, sugars, spices) to the butter and mix 20-30 sec/speed 4 before storing in the fridge.

Nutrition per 25 g

  • Calories 829.8 kJ / 197.5 kcal
  • Protein 1.4 g
  • Carbohydrates 1.1 g
  • Fat 21.3 g
  • Saturated Fat14 g
  • Fibre 0 g
  • Sodium1 2.9 mg

Get this recipe on Cookidoo https://cookidoo.co.uk/recipes/recipe/en-GB/r68363

Save money with Thermomix: Icing sugar

Save money with Thermomix. It’s what we as owners and users say all the time. But finally, I’m able to share some of the cost savings with specific recipes like this icing sugar but also one that is a wow, demonstration recipe.

Why is it a wow recipe?  Well simply put it shows off the milling function beautifully.  Speeds 7 – 10 and Turbo: Grinding or miling ingredients such as sugar, wheat and coffee beans, blending to a completely smooth texture for creamy soups, smoothies, and ice-cream and chopping tough ingredients such as cured ham and hard cheeses.

Powdered sugar, also called confectioners’ sugar, or icing sugar, is a finely ground sugar produced by milling granulated sugar into a powdered state. Powdered Sugar is made by grinding granulated sugar with cornstarch to the desired grain size. White in color, powdered sugar has a sucrose content of approximately 97.0% and a cornstarch content of approximately 3.0% to prevent caking and increase shelf life. However, making your own in your Thermomix can your money on buying ready-milled icing sugar and you can do it instantly, hence not needing any corn starch too, so 100% pure.

But we’re here to talk about cost savings, so I’ve done a quick search for some tomato soups in an online supermarket. I’ve chosen Tesco today, but I will be comparing all of them in this series of articles to be fair.

Compare this with the cost of their granulated sugar, which you can mill into icing sugar

The cost savings would be £1.15 on the Silver Spoon and only 70p on the Billingtons. 

That kind of makes sense, as Golden Caster Sugar is more expensive so you would see a saving but not as much. But image how much you could save on a weekly, monthly, or even yearly basis. These pennies can add up to pounds very quickly especially if you bake a lot which I do.

*What Is Golden Caster Sugar? Most commonly found in the UK, golden caster sugar is made from unrefined sugar cane and sometimes beets. It has a subtle buttery flavor and gives baked goods a lovely shade of brown.

Ingredients

  • 200 g sugar

Preparation

  1. Place sugar in mixing bowl and grind 20 sec/speed 10. Use icing sugar as needed.

Hints & Tips

  • Icing sugar can be stored for long periods of time in an airtight container.
  • For best results, grind sugar in 100-200 g batches.
  • If more icing sugar is needed, repeat the process.

Get this recipe on Cookidoo https://cookidoo.co.uk/recipes/recipe/en-GB/r178855

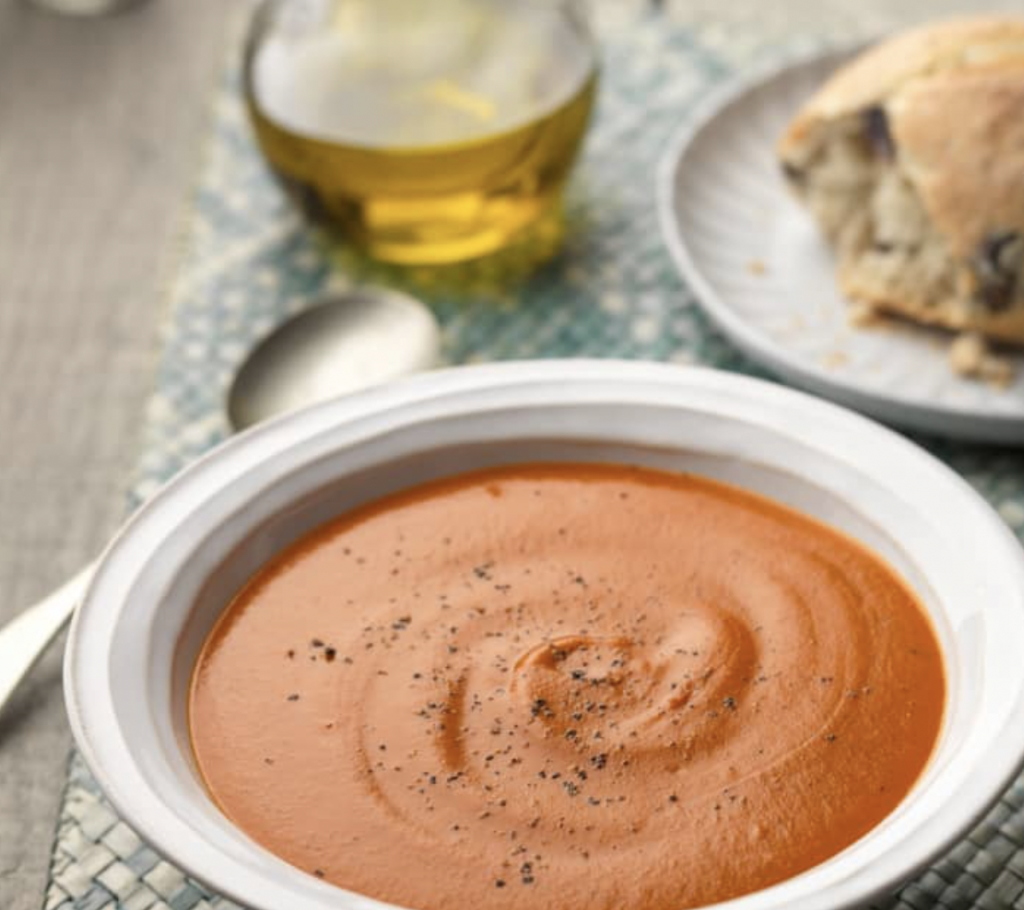
Save money with Thermomix: Red Pepper and Tomato Soup

Save money with Thermomix. It’s what we as owners and users say all the time. But finally, I’m able to share some of the cost savings with specific recipes like this Red Pepper and Tomato Soup which is one of our household staples but also one that is a wow, demonstration recipe.

Why is it a wow recipe? Well, this recipe is so easy to make but showcases some of the greatest Thermomix functions – the milling and grinding of the lentils to a powder which means when they are added back into the soup to thicken and add protein, they could faster, the blending ability to not need to peel the red pepper skins which are usually so hard to do and speed which keeps this soup red and vibrant in colour, means we haven’t lost the vitamins and minerals by overcooking and boiling. I challenge many of my demonstration guests to re-do this recipe manually or using their own kitchen equipment and the Thermomix version comes out on top in texture and flavour, every, single, time.

But we’re here to talk about cost savings, so I’ve done a quick search for some tomato soups in an online supermarket. I’ve chosen Waitrose today, but I will be comparing all of them in this series of articles to be fair.

Ingredients

  • 40 g lentils
    or rice
  • 2 garlic cloves
  • 50 g onions, quartered
  • 200 g red peppers, quartered (approx. 2 peppers)
  • 50 g olive oil
  • 400 g ripe tomatoes, cut in pieces (2 cm)
    or tinned chopped tomatoes
  • 400 g water
  • 1 heaped tsp vegetable stock paste, homemade
    or 1 vegetable stock cube (for 0.5 l), crumbled
  • 1 tsp fine sea salt, or to taste
  • ½ tsp ground black pepper, plus extra for sprinkling
  • ¼ tsp ground cayenne pepper (optional)

Preparation

  1. Place lentils in mixing bowl and grind 20 sec/speed 10. Transfer to a bowl and set aside.
  2. Place garlic, onions, red peppers and oil in mixing bowl then chop 2 sec/speed 5. Scrape down sides of mixing bowl with spatula then, with simmering basket in place of measuring cup, sauté 5 min/100°C/speed 1.
  3. Add tomatoes, water, vegetable stock paste, reserved ground lentils, salt, pepper and cayenne pepper (if using) then, with simmering basket in place of measuring cup, cook 14 min/100°C/speed 2.5. Insert measuring cup then start Blend /1 min.
  4. Divide between serving bowls and serve sprinkled with pepper.

Hints & Tips

  • Serves 4 for lunch with crusty bread, 6 as a dinner party starter or 12-15 as a lovely amuse-bouche served in shot glasses.
  • For a milder flavour, omit cayenne pepper in step 3.
  • For a Carrot and Lentil Soup, substitute red peppers with 350 g carrots, cut in pieces (3 cm), in step 2 then chop 6 sec/speed 5. Omit tomatoes in step 3 and, after blending, thin to desired consistency with 50-100 g extra stock before blending again 30 sec/speed 10.
  • Steam vegetables in the Varoma while the soup is cooking. Before cooking in step 3, place covered Varoma with vegetables into position and steam using Varoma temperature instead of 100°C.

Get this recipe on Cookidoo https://cookidoo.co.uk/recipes/recipe/en-GB/r448440

Save with Thermomix and make your own Yorkshire Puddings

Yorkshire pudding is a baked pudding made from a batter of eggs, flour, and milk or water and is so easy to buy these days, but even easier if made in your Thermomix. Save over £2.50 each time you make our Cookidoo recipe.

Ingredients

  • 500 g water
  • 1000 g potatoes (see tip), peeled, quartered (approx. 5 cm)
  • 4 Tbsp vegetable oil
  • coarse sea salt, to taste
  • ground black pepper, to taste
  • 5 – 6 garlic cloves, lightly crushed, to taste
  • 4 sprigs fresh rosemary, leaves only

Preparation

  1. Place water in mixing bowl. Place Varoma dish into position then weigh in potatoes. Distribute potatoes between Varoma tray and Varoma dish, ensuring some holes remain uncovered for steam to circulate, then insert Varoma tray. Cover Varoma then steam 16-18 min/Varoma/speed 2 until almost cooked and edges are softened (see tip). Towards the end of this time, preheat oven to 190°C.
  2. Remove covered Varoma and shake slightly to roughen edges of potatoes, then transfer to a large roasting tin. Drizzle over oil, sprinkle with salt and pepper to taste then roast for 30 minutes (190°C). Turn potatoes, add garlic then roast for a further 10 minutes (190°C).
  3. Add rosemary then roast for a further 5-10 minutes (190°C) until golden and crisp. Serve immediately.

Hints & Tips

  • Roast potatoes are an essential accompaniment to any roast meal. In this version, we steam the potatoes in the Varoma before finishing them off in the oven with a couple of garlic cloves and a few sprigs of rosemary. Serve them to your guests and watch them fight over who gets the crispiest ones!
  • King Edward, Maris Piper and Désirée are good roasting potato varieties.
  • To get ahead, par-steam potatoes in step 1 then allow to cool before freezing. For extra crunchy results, transfer frozen potatoes to a large roasting tin and continue with recipe, roasting from frozen, watching carefully in step 3 to avoid over-cooking.
  • Goose fat can also be used for roasting the potatoes. Although no longer vegetarian, the results will be even crispier.

Nutrition per 1 portion

  • Calories 892.4 kJ / 213.3 kcal
  • Protein 3.5 g
  • Carbohydrates 30.2 g
  • Fat9.6 g
  • Saturated Fat 1.4 g
  • Fibre 3.8 g
  • Sodium 14 mg

Get this recipe on Cookidoo https://cookidoo.co.uk/recipes/recipe/en-GB/r491037


Save with Thermomix and make your own spuds

Try making your own potatoes this Christmas and save with Thermomix.  A simple, healthy side dish bursting with festive flavors. These classic roasties with garlic and rosemary are perfect sides for your Christmas lunch and can be frozen ahead to make your life easier.

Ingredients

  • 500 g water
  • 1000 g potatoes (see tip), peeled, quartered (approx. 5 cm)
  • 4 Tbsp vegetable oil
  • coarse sea salt, to taste
  • ground black pepper, to taste
  • 5 – 6 garlic cloves, lightly crushed, to taste
  • 4 sprigs fresh rosemary, leaves only

Preparation

  1. Place water in mixing bowl. Place Varoma dish into position then weigh in potatoes. Distribute potatoes between Varoma tray and Varoma dish, ensuring some holes remain uncovered for steam to circulate, then insert Varoma tray. Cover Varoma then steam 16-18 min/Varoma/speed 2 until almost cooked and edges are softened (see tip). Towards the end of this time, preheat oven to 190°C.
  2. Remove covered Varoma and shake slightly to roughen edges of potatoes, then transfer to a large roasting tin. Drizzle over oil, sprinkle with salt and pepper to taste then roast for 30 minutes (190°C). Turn potatoes, add garlic then roast for a further 10 minutes (190°C).
  3. Add rosemary then roast for a further 5-10 minutes (190°C) until golden and crisp. Serve immediately.

Hints & Tips

  • Roast potatoes are an essential accompaniment to any roast meal. In this version, we steam the potatoes in the Varoma before finishing them off in the oven with a couple of garlic cloves and a few sprigs of rosemary. Serve them to your guests and watch them fight over who gets the crispiest ones!
  • King Edward, Maris Piper and Désirée are good roasting potato varieties.
  • To get ahead, par-steam potatoes in step 1 then allow to cool before freezing. For extra crunchy results, transfer frozen potatoes to a large roasting tin and continue with recipe, roasting from frozen, watching carefully in step 3 to avoid over-cooking.
  • Goose fat can also be used for roasting the potatoes. Although no longer vegetarian, the results will be even crispier.

Nutrition per 1 portion

  • Calories 892.4 kJ / 213.3 kcal
  • Protein 3.5 g
  • Carbohydrates 30.2 g
  • Fat 9.6 g
  • Saturated Fat 1.4 g
  • Fibre 3.8 g
  • Sodium 14 mg

Get this recipe on Cookidoo https://cookidoo.co.uk/recipes/recipe/en-GB/r491037

Save with Thermomix and make your own Parsnips

This is one of the nicest ways to serve parsnips, baked crisp and golden brown in the oven with a Parmesan coating. Try making your own Honey Parmesan Parsnips this Christmas and save with Thermomix.

Ingredients

  • 100 g Parmesan cheese, cut in pieces (2 cm)
  • 5 sprigs fresh thyme, leaves only
  • 4 sprigs fresh rosemary, leaves only
  • ½ tsp fine sea salt
  • 2 pinches ground black pepper
  • 100 g polenta
  • 3 Tbsp olive oil
  • 30 g unsalted butter, diced
  • 500 g water
  • 800 g parsnips, peeled, quartered lengthways
  • 4 garlic cloves
  • 100 g runny honey

Preparation

  1. Place Parmesan, thyme, rosemary, salt and pepper in mixing bowl then grate 10 sec/speed 10.
  2. Add polenta and mix 10 sec/reverse/speed 4. Transfer to a large bowl and set aside.
  3. Place oil and butter in a roasting tin and set aside.
  4. Place water in mixing bowl. Place Varoma dish into position then weigh in parsnips. Remove Varoma and divide parsnips between simmering basket, Varoma dish and Varoma tray (see tip), ensuring some holes remain uncovered for steam to circulate. Insert simmering basket then insert Varoma tray. Place covered Varoma into position then steam 15-18 min/Varoma/speed 1 until just tender. Meanwhile, preheat oven to 190°C then place prepared tin inside to preheat.
  5. Remove Varoma dish and remove simmering basket with aid of spatula then immediately transfer parsnips to bowl with Parmesan mixture and toss to coat.
  6. Remove roasting tin from oven and carefully place parsnips in hot oil. Mix well to coat then roast for 15-20 minutes (190°C) until lightly golden and crisp. Meanwhile, discard steaming water, dry mixing bowl and continue with recipe.
  7. Place garlic in mixing bowl and chop 3 sec/speed 5. Scrape down sides of mixing bowl with spatula then chop again 2 sec/speed 5. Scrape down sides of mixing bowl with spatula.
  8. Add honey and mix 10 sec/speed 6. Once parsnips are roasted, pour over garlic honey, toss to coat and bake for a further 3-5 minutes (190°C) until golden. Serve hot.

Hints & Tips

  • Roasted parsnips are always a favourite at the Christmas table, and we’ve added a twist to make this popular dish even better. The herby Parmesan and polenta coating makes them extra crunchy, and the honey dressing helps the natural sweetness of the vegetable shine through.
  • When distributing parsnips, place larger pieces in simmering basket and smaller pieces in Varoma tray to ensure even cooking.
  • If desired, the garlic honey glaze can be omitted. Simply stop the recipe at the end of step 6 and serve crispy Parmesan parsnips as they are.

Nutrition per 1 portion

  • Calories 1390 kJ / 333 kcal
  • Protein 9g
  • Carbohydrates 33 g
  • Fat 17g
  • Saturated Fat 7g
  • Sodium 313 mg

Get this recipe on Cookidoo here: https://cookidoo.co.uk/recipes/recipe/en-GB/r491061

Save with Thermomix and make your own stuffing

Try making your own gluten-free mushroom stuffing this Christmas and save with Thermomix. This GF Vegan Mushroom Stuffing is loaded with mushrooms, onions, & herbs, for a fantastic holiday side dish that you will love.

Ingredients

  • 25 g dried porcini mushrooms
  • boiling water, for soaking
  • 100 g hazelnuts
  • 10 g fresh parsley leaves
  • 3 garlic cloves
  • 80 g shallots, halved
  • 20 g olive oil
  • 300 g chestnut mushrooms, quartered
  • 250 g fresh portobello mushrooms, cut in pieces (3 cm)
  • 6 sprigs fresh thyme, leaves only
  • 1000 g water
  • 150 g quinoa
  • ½ tsp fine sea salt
  • 2 pinches ground black pepper

Preparation

  1. Place a bowl on mixing bowl lid and weigh in porcini mushrooms. Remove bowl from lid, cover with boiling water and leave for 5 minutes then drain mushrooms, discarding soaking liquid. Meanwhile, continue with recipe.
  2. Place hazelnuts in mixing bowl and chop 2 sec/speed 7. Transfer to a bowl and set aside.
  3. Place parsley in mixing bowl and chop 3 sec/speed 7. Transfer to bowl with hazelnuts and set aside.
  4. Place garlic, shallots and oil in mixing bowl then chop 3 sec/speed 5. Scrape down sides of mixing bowl with spatula then sauté 5 min/120°C/speed 1.
  5. Add chestnut mushrooms, portobello mushrooms, thyme and reserved drained porcini mushrooms then, with aid of spatula, chop 3 sec/speed 4. Scrape down sides of mixing bowl with spatula then, with aid of spatula, chop again 1 sec/speed 4. Scrape down sides of mixing bowl with spatula then insert measuring cup and sauté 5 min/120°C/reverse/speed spoon. Transfer to a large bowl and leave to cool completely. Meanwhile, continue with recipe.
  6. Place water in mixing bowl. Insert simmering basket and weigh in quinoa. Rinse 10 sec/speed 5 then cook 10-15 min/Varoma/speed 4 until cooked. Remove simmering basket with aid of spatula and set aside. Discard steaming water.
  7. Preheat oven to 190°C and line a baking tray with baking paper.
  8. Place reserved mushroom mixture, reserved cooked quinoa, reserved hazelnut mixture, salt and pepper in mixing bowl then mix 20 sec/reverse/speed 4. Finish mixing with spatula if necessary.
  9. Use to stuff the turkey neck cavity if desired (see tip) then shape remainder into balls (approx. Ø 4 cm) and place on prepared tray. Bake for 15 minutes (190°C) then cover with foil and bake for a further 30-40 minutes (190°C) until golden. Serve warm.

Hints & Tips

  • Only stuff the neck end of the turkey, just before cooking, and seal it by tucking in the skin. Make sure to allow enough room for stuffing to expand during cooking. Do not stuff the body cavity. Make sure you calculate the correct cooking time – as a guide, for every 500 g stuffing used, add an additional 10 minutes to the unstuffed turkey cooking time.
  • This stuffing is also delicious served with a vegetarian or beef Wellington or used to stuff a roast chicken.

Nutrition per 1 portion

  • Calories 807 kJ / 194 kcal
  • Protein 7 g
  • Carbohydrates 13 g
  • Fat 12 g
  • Saturated Fat 1.1 g
  • Fibre 4 g
  • Sodium 80 mg

Get this recipe on Cookidoo here: https://cookidoo.co.uk/recipes/recipe/en-GB/r491061


Christmas Gifting – Honeycomb

Christmas is around the corner and homemade Christmas gifts are a great cost-saving and a way to show you care. Here’s a recipe for Honeycomb made in the Thermomix and the cost saving you can have compared to buying it.

Whether you call it honeycomb, hokey pokey or cinder toffee, this Thermomix recipe is amazing.

Ingredients

  • 1 tbsp bicarbonate of soda, sifted
  • 300 g white sugar
  • 1080 g water
  • 20 g honey or golden syrup
  • 50 g vinegar

Preparation

  1. To guarantee the success of recipes using Sugar Stages, please follow the exact quantity and description for all ingredients. The recipe should also be cooked immediately after placing the sugar with the other ingredients in the mixing bowl.
  2. Line a square cake tin (18 x 18 cm) with baking paper (paper should be approx. 5 cm higher than the tin – see Tips) and place on a heat-resistant surface.
  3. Sift bicarbonate of soda and set aside. Place sugar, 80 g water and honey into mixing bowl and start Sugar Stages without measuring cup.
  4. Immediately add reserved bicarbonate of soda around the blades and quickly stir with spatula until mixture foams up, taking care not to over mix. Transfer immediately into prepared cake tin. Using spatula, remove any mixture from the mixing bowl rim to be able to close the lid correctly for pre-cleaning.
  5. Place 1000 g water and vinegar into mixing bowl and start Pre-clean.
  6. Allow to cool completely to room temperature and break into pieces. Store in a sealable container at room temperature (see Tip). Use as required.

Hints & Tips

  • This lovely treat looks similar to real honeycomb. Bicarbonate of soda is the secret to achieving an airy texture. Stirring it in at the last minute is the reason for its namesake appearance. Honey is used to flavour the caramel. Honeycomb is great to decorate with and it is also good added to other desserts. Break the honeycomb into pieces or crush it and sprinkle over ice cream, for example.
  • Honeycomb cannot be left out in the open for an extended length of time, as it will draw moisture from the air and become sticky. Store in snap lock bags or wrap in plastic wrap and place into a sealable container for up to a week. However it is best eaten soon after it is made. Dipping honeycomb pieces into melted chocolate helps extend shelf-life by a few days.
  • Extending the baking paper up the sides of the cake tin encourages the honeycomb to rise.

Nutrition per 1 portion

  • Calories 445.3 kJ / 106.3 kcal
  • Protein 0 g
  • Carbohydrates2 6.2 g
  • Fat 0 g
  • Saturated Fat 0 g
  • Fibre 0 g
  • Sodium 830.4 mg

Get this recipe on Cookidoo https://cookidoo.co.uk/recipes/recipe/en-GB/r437218